Setting Up a New DaDesktop Server
Rolling Out a DD Node on GTHost or Hetzner Servers
These notes are here to assist you with setting up a DaDesktop Node (Server) on a bare metal Linux server from providers like GTHost, Hetzner, or similar services. Keep in mind they may evolve as the installation and deployment scripts are updated.
The guide assumes you've already acquired a server and plan to install Ubuntu Jammy 22.04 on it. If you have multiple disks, you might use RAID0 (striping) to boost disk speed. For Hetzner, this configuration must be done through the 'installimage' process while in Rescue mode.
Getting Ready: OS Installation on GTHost/Hetzner Servers
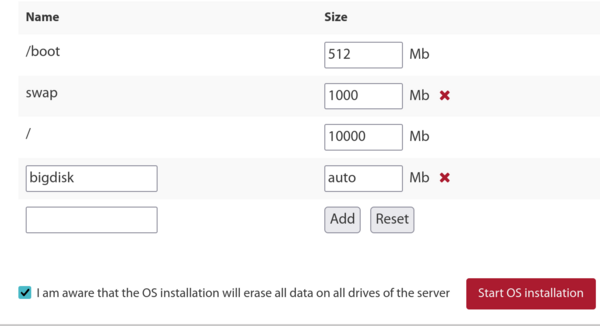
- First, SSH into the server using the root credentials provided. Run 'apt update' and 'apt upgrade' to bring all packages current. Afterwards, clean up by running 'apt autoremove' to remove any outdated packages before proceeding.
- On Hetzner, the server boots into rescue mode, so you'll need to set the distribution details, software RAID (like mdm), filesystem (xfs), and IPv4 before rebooting and upgrading. Usually, it's fine to stick with the default options for small /boot and /boot/esp partitions using ext4 rather than xfs, and skip the swap partition since it's unnecessary. Let the / partition use xfs and take up the remaining disk space.
- With LeaseWeb or other providers, you'll have to switch the root filesystem from ext4 or btrfs to xfs. The instructions here are only a guide; setting up the / partition with xfs is trickier than creating a separate /bigdisk for xfs, because filesystem alterations must be done from outside the OS. It's not straightforward or safe to change the type of the / filesystem while it's mounted.
-
If possible, use the provider's tool to create the xfs filesystem—it's much simpler. Alternatively, from the rescue system, you can run a command like:
mkfs.xfs -f /dev/mdx (the -f flag forces the overwrite, formatting the / partition as xfs).
Note that we no longer create a separate /bigdisk partition; it's now just a directory under /. - Mount the xfs filesystem by running 'mount -t xfs /dev/mdX /' from outside the OS, or use the system portal to achieve the same.
- If you still opt for a separate /bigdisk partition (though it's not common practice anymore), add 'defaults,nofail 0 0' to /etc/fstab. This ensures the system can still boot even if that partition fails to mount.
- Run 'systemctl daemon-reload' so systemd picks up changes in /etc/fstab.
- Then, execute 'mount -a' to verify that partitions are created as needed, and confirm with 'df -T'.
-
Finally, reboot the machine.
Executing the DaDesktop Installation Script
- SSH into the server using an address like user@xxxxxxxxx.
- Use the DaDesktop installation script to begin the setup:
- Download the script by running: curl http://npg.io/d > d
- At this stage, you should upgrade the base OS from 22.04 to the newest Ubuntu release, which is currently 23.10 (Mantic) and will soon be 24.04 (Noble).
- The most efficient way is to use the 'update-os' script found at /apps/dadesktop_npnode_deploy/modules/00-upgrade-os. This automates the process, saving you from manual dist upgrades, and updates the apt sources from 'jammy' to 'mantic' in one go. Normally, skipping a version during an upgrade is risky, but here it's safe because so few packages are installed.
-
Should DNS fail during the distro upgrade (as happened once to us), you can resolve it by running:
rm /etc/resolv.conf ; echo "nameserver 8.8.8.8" > /etc/resolv.conf - If you want to assign a particular hostname—for instance, if you're recreating a previously configured node—you can set it now, like lo33uk.npg.io. A reboot may be needed for the hostname to take effect.
- Then, execute the main installation script for the DD Node. To protect against a dropped SSH connection during the process, you might launch it inside tmux. From the directory where you downloaded the script, run 'bash d'.
- Monitor the on-screen logs for errors. The script will automatically whitelist the server's IP, but you might need to wait a minute or two for the cron job to refresh the list before proceeding.
- Keep an eye on the script's progress and resolve or report any issues that arise.
- After installation, run the cleanup script at /apps/dadesktop_npnode_deploy/modules/00-cleanup to strip out unused packages and downgrade a few others.
- Execute /apps/zabbix-agent/services/test-all.sh to catch any remaining problems.
- Purge any unmaintained packages with 'apt purge package1 package2', and delete any broken links that appear.
-
Finally, reboot and verify that everything is working correctly.
Post-Installation Testing of the DD Node
- Look for the new DD server entry in the DaDesktop GUI and test it using TPAPI or similar tools.
- Set the start and end dates for the server, and if needed, assign it to a datacenter.
- Verify the server appears and operates correctly in Zabbix, and tidy up any issues.
- Confirm everything works by adding a Standalone session to the server and running it.
- If necessary, place the server in the appropriate datacenter.
- Optionally, configure billing rules for the new server.
- If needed, copy operating system templates over to the server.
- If the server is destined for a specific course, inform the trainer or coordinator to use it.
Enjoy !